This code recipe allows you to send a custom email template for members who renew their membership. The email replaces the standard checkout template a first time member would have received (i.e. checkout_paid.html or equivalent). A list of all default email templates is available here. The Code Recipe View the code on Gist. Copy and paste this code recipe into your theme’s functions.php file or a helper PMPro Customizations plugin (our recommended method). Be sure to create the checkout_renewal.html email in the location defined on line 36 (or modify that line with the name and location of your template file.
↧
Customize the Membership Checkout Confirmation Email for Membership Renewals
↧
New Method to Load Custom Templates for PMPro-Generated Pages or System-Generated Emails
v1.8.9 of Paid Memberships Pro includes the new function pmpro_loadTemplate that we use when loading any of the plugin-generated pages or system-generated emails. Having a central function to load these templates makes it easier to add templates of your own or filter PMPro to load templates from a different location.
Overriding PMPro Page Templates
Paid Memberships Pro generates frontend page content via the shortcodes pmpro_account, pmpro_billing, pmpro_cancel, pmpro_checkout. pmpro_confirmation, pmpro_invoice, and pmpro_levels. If you cannot accomplish your customization needs via hooks and filters or a custom stylesheet/CSS and need finer control over the HTML code generated, then you might want to override the template files for these pages.
By default, Paid Memberships Pro will look in your active theme (and parent theme if applicable) for a directory named “paid-memberships-pro/pages”. You can then copy files from /wp-content/plugins/paid-memberships-pro/pages/ into that folder and tweak the files to your needs. PMPro will load your modified version of the template instead of the default one that is bundled with Paid Memberships Pro.
This way you can edit those files without breaking your changes when you upgrade Paid Memberships Pro later. There still made be additions or changes to our default templates that you will want to or need to change in your custom templates, but you’ll have less work to do than if you “hacked the core” PMPro plugin.
You can see the full documentation on using custom PMPro page templates here.
NEW: Loading Custom Page Templates From a Plugin Instead of Your Theme
Before PMPro v1.8.9, if you wanted to load a custom page template from somewhere outside your theme’s /paid-memberships-pro/ directory you had to create a separate filter and callback for each template you wanted to override. If you were editing multiple templates, you would have a lot of similar code filling up your customizations plugin.
Since v1.8.9, you can use the new pmpro_pages_custom_template_path filter to tell PMPro to check a specific directory for ALL page templates. If the template is found, it will be used. If it’s not found, PMPro will continue to look in the theme and default pages folder.
So if you have a plugin pmpro-customizations.php with a folder “pages” in it, you can tell PMPro to use templates from that pages folder using code like this:
View the code on Gist.
Creating your own page templates.
If you are loading a template in a plugin or addon of your own, there are many ways to do that from PHP require() or include() functions, to the WordPress get_template_part() function.
Now if you are building a PMPro addon and want to allow users to be able to override your template by placing their own versions in the /paid-memberships-pro/pages/ directory of their theme, you can use pmpro_loadTemplate. Here is an example that will load your own template file. We’ll be updating our addons to work the same way.
View the code on Gist.
Which emails can I modify?
Any of them. See the full list of system-generated emails here. The preferred way to edit the core email templates is through the Email Templates Admin Editor Addon.
NEW: Loading Custom Email Templates From a Plugin Instead of Your Theme
However, sometimes you need to programatically update email templates. Similar to filtering page templates, you can use the pmpro_email_custom_template_path filter like this:
View the code on Gist.
You can also create your own email templates and load them using pmpro_loadTemplate(‘name’, NULL, ’email’); which will try to load email templates from /wp-content/themes/your-theme/paid-memberships-pro/email/name.html.
Note that we use “email” without an S for our email folder but “pages” with an S for the pages folder.
We’re going to be adding some extra helper functionality around creating new email templates and integrating them with the Email Templates Admin Editor so users can easily override the email templates your addons use. When we get that done, we’ll post to the blog here. In the meantime, we can help in the member forums.
↧
↧
Display Custom Membership Level Options Based on Current User’s Level
I was recently asked how a site could customize their membership levels page to show different levels to the visitor and the logged-in member (for “upgrade” levels). This is useful if you have a specific upgrade path, be it for courses, a unique step-by-step program or other “tiered” access that you want to control the flow for.
This can be easily accomplished using the built-in [membership] shortcode alongside our Advanced Levels Page Shortcode Add On.
How to Do it: Demo
[membership level="0"]
<!--this is shown to non-members and non-logged in visitors-->
[pmpro_advanced_levels levels="1,2,3" layout="3col"]
[/membership]
[membership level="1,2"]
[pmpro_advanced_levels levels="2,3" layout="2col"]
<!--this is shown to Level 1 and 2 Members-->
[/membership]
[membership level="3"]
[pmpro_advanced_levels levels="4"]
<!--this is shown to Level 3 Members-->
[/membership]
Read documentation on the [membership] shortcode and our Advanced Levels Page Shortcode Add On for instructions on how to modify this demo code for your project.
It may also be smart to add a link to your login page above or below the levels shortcode, something along the lines of:
[membership level="0"]
<!--this is shown to non-members and non-logged in visitors-->
<div class="pmpro_message pmpro_alert">
	Already a member? Log In to unlock additional membership options.
</div>
[/membership]
Important Notes
- Setting up the site in this method will not put the checks in place to require a level in order to check out for another level (i.e. if you have to purchase Level 1 in order to upgrade to Level 2). Checkout the code recipe below for a tutorial to put that registration check in place.
Require a Specific Level to Allow Registration for Another Level
- Don’t check the box to “Disable Signups” for the levels on the Memberships > Levels > Edit Level page. This totally blocks the level for public registrations (as well as display on a page using the [pmpro_levels] or [pmpro_advanced_levels] shortcodes).
↧
Change Frontend Text for Addon Package Purchase Using WP’s gettext Filter
This code recipe shows you how to use the gettext filter in WordPress to change some of the frontend text generated in the Addon Packages plugin. It updates the message shown for the pages/posts/content that you sell à la Carte.
↧
Display a Count of Members by Level and/or Status via Shortcode
This nifty little shortcode will output the number of members in a level (or across all levels).
The output displays a message in the format: “This site has 25 Gold members”, or you can define the attribute ‘justnumber’ to output only the count of members and craft your own message like the one pictured to the right.
Shortcode Attributes
- justnumber: Show just the count of members (optional; default: NULL)
- level: A single level ID or comma-separated list of level IDs (optional; default: count for all levels)
- status: A single status or comma-separated list of statuses (optional; default: ‘active’)

The Shortcode Plugin
↧
↧
Restrict Membership Signup by Country
This code recipe allows you to restrict members in specific countries from signing up.
The restricted countries are defined in a $restricted_countries array of level IDs and country codes (see the $pmpro_currencies array in the plugin file /includes/countries.php for included country codes).

↧
Sister Plugin for Addon Packages: Apply Parent Page’s Protection to All Child Pages
If you’re using Addon Packages to sell “à la carte” access to a single page, this sister plugin will extend the page protection to all child pages. If the feature proves popular, it may become a default part of the add on with filter to disable.
If a page’s parent has a price (defined as an “Addon Package”), the page will inherit its parent’s settings and show a default message about the restriction, the price, and a link to checkout.

↧
Award MyCRED Points for Membership Level Checkout
If you’re using MyCRED or considering a system to award users for interacting with your WordPress powered website, this code recipe will set up a custom MyCRED hook to award points when a member signs up for level ID 1.

You can customize the recipe for your specific point values and level IDs. This may eventually become a full MyCRED Add On for Paid Memberships Pro – so please share a comment if you are interested and some feedback on requested features.

↧
Membership Logic to Enable or Disable Popups for Popular WordPress Popup Plugins
Using popups to generate more membership signups or show exclusive offers to members only can be a great addition to your membership site. But, how do you filter popups to target the RIGHT audience?
Enter the filters…
The code recipes below demonstrate how to filter popups based on the user or site visitor’s membership level. We like using this method in combination with the new Signup Shortcode Add On for a streamlined “Unlock this post now” experience.
Popup Maker — WordPress Repo | Plugin Homepage
When I began this post, I was looking in the WordPress plugin repository for a basic, open source popup plugin with simple styling options: enter Popup Maker.
This code recipe will filter the display of a popup using Popup Maker’s pum_popup_is_loadable filter. The recipe hides the popup if there is a logged in user with membership level ID 1. You can modify the recipe for your level IDs, or change the conditional to require level ID 1 or an array of level IDs.
Popups – WordPress Popup — WordPress Repo | Plugin Homepage
This open source option is loaded with integrations for popular third-party form plugins and engagement tools. There are some built-in filters for the popup display cases, just not for membership level…
This code recipe will filter the display of a popup using the Popups plugin’s custom rules filter. The recipe enables the popup ONLY for a logged in user with membership level ID 1. You can modify the recipe for your level IDs, or change the conditional to hide for level ID 1 or an array of level IDs.
Popup Builder — WordPress Repo | Plugin Homepage
This is a more bare-bones popup option, but for my testing did just what I needed it to do without hassle.
This code recipe will insert the selected popup shortcode via wp_footer throughout your site to any non-member. You can modify the recipe for your level IDs, or change the conditional to hide for level ID 1 or an array of level IDs.
OptinMonster — Plugin Homepage
OptinMonster is more than just a popups plugin, with premium features for inserting optin forms in posts, in a floating bar, based on exit-intent and more. A paid account (starting at $49/yr) is required to use the plugin.
This code recipe will remove the optin using a script placed via the wp_footer action. The recipe hides to popup for all logged in users with any membership level. You can modify the recipe for your level IDs, or change the conditional to enable the popup for members only.
↧
↧
Advanced Category Techniques for Filtering Searches and Archives to Members and Non-Members
If you’ve set the option “Filter Searches and Archives” to “Yes” under the Memberships > Advanced Settings page, all of the posts in your members-only categories will be hidden from the main page, archives, and search queries. This code gist allows you to add specified categories back into the query.
Why would I want to do this?
This is useful for sites that want to totally exclude posts from certain categories from being seen by a visitor or indexed by search engines, while keeping posts in other restricted categories discoverable.
Note that the posts in these categories will still be locked to members-only, they’ll just appear in the appropriate places as teaser content for your membership offering.
The Code Recipe
↧
Send a Member’s Address Fields to MailChimp
Our MailChimp Integration adds members to assigned lists within your MailChimp account.
This code recipe demonstrates how to include the member’s billing address fields in the data sent to MailChimp. If you are using the Shipping Address Add On, this recipe could be modified to send those fields in place of billing (or see this post for sending other profile info).

↧
Display Your Business Address and VAT Number (optional) on Membership Invoice and Confirmation
Provide members with your business address and VAT Number for tax and recording keeping purposes using this simple code recipe. The recipe will add your information to the Membership Invoice screen and print views, as well as the Membership Confirmation page.

↧
Lock Posts to Members-Only After Specific Timeframe
Allow public access to your members-only content for a set timeframe. The example below allows all members-only posts to be viewed for 24 hours, after which membership will be required to view. This recipe is a variation of our previous technique to hide old posts from new members. The Code Recipe View the code on Gist. Copy and paste this code recipe into your theme’s functions.php file or a helper PMPro Customizations plugin (our recommended method). Update line 20 with your specific timeframe.
↧
↧
Set the bbPress User Profile as Membership Account Page
If you’re using bbPress for your membership site, the code recipes below are designed to streamline the member’s various profile/account pages into one primary dashboard: the forum user profile (located at /forums/users/nicename).

This recipe will redirect the specified “Membership Account” page to the bbPress Profile for your member. A recipe is also included to insert the [pmpro_account] shortcode before other default content in the “Profile” tab of this page. You can use the base shortcode [pmpro_account] OR specify sections to display using the “sections” attribute of the shortcode.
↧
Best Practices for Member Log In and Log Out
Easily add a front-end log in, log out, and password reset experience to your membership site by following the steps covered in this post. We’ll outline our recommended third party plugin for front-end login, as well as some “best practice” guidelines for placing these links on your site using your theme or Memberlite.
Topics include: Recommended Plugin | Configuring TML | Link Placement Best Practices | Styling the Login Page | A Conditional Login/Logout Link
Wait, doesn’t Paid Memberships Pro do this?
Our plugin allows the member account to be created in one step as part of checkout. But, returning members need to be able to easily access your login and password reset pages.
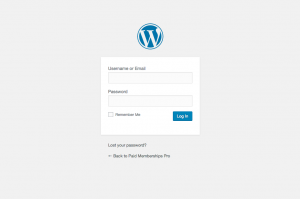
PMPro does not alter the main WordPress login functionality, so users will see the same WordPress-themed “Log In” page that you are probably familiar with. Use our recommendation below to add frontend login.
We recommend Theme My Login
Theme My Login by Jeff Farthing creates a themed (frontend) login, password recovery, and user profile section. In addition, we recommend the plugin for login redirection settings and blocked “admin” access.
Download Theme My Login via the WordPress.org Plugin Repository
…or search for “Theme My Login” from the Plugins > Add New page in the WordPress admin.
Configuring Theme My Login
When you activate TML, the plugin will generate five pages: Login, Log Out, Lost Password, Reset Password, and Register. All of these pages except the “Register” page will be used in your membership site (we redirect all User Registration to the Membership Levels page for level selection and, hopefully, membership checkout).
There are no additional steps required at this point to make TML functional. You can certainly edit the generated pages to add additional styles, widgets, wording, etc. Just be sure you do not remove the [theme-my-login] shortcode from the page content.
Where to add your “Log In” links
Today’s web user has certain expectations about your site’s “Log In” links. Here are some best practices to consider:
- The link is expected to be placed in the upper right corner of the page.
- Consider placing a “Sign Up” (Join or Register) link in this same space as well.
- The link should be present across all pages on your site.
- Swap to a “Log Out” link once the member has logged in.
- The “Log Out” link is often accompanied by a reminder of the logged in member’s display name that links to their membership account details or profile.
- If your site is responsive, make sure that your “Log In” links are present in the smaller device views, either at the very top of the screen or in your mobile/responsive menu.
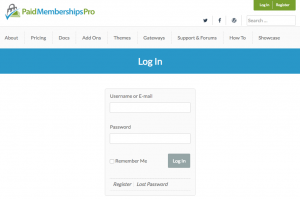
 Memberlite does all of the above by default, excluding the “Mobile” view of your log in link. If you’re running Memberlite, I recommend using the TML plugin and adding the “Theme My Login” widget to the “Mobile Menu” widget area. The screenshot to the right shows how I have it configured for the Paid Memberships Pro website.
If your theme does not have a widget, menu area, or hook in place to add a log in feature in the upper right, open a topic on our members forum and we will help you find the best way to add this to your site.
We also include a “Log In” link in the default message that a visitor sees when trying to access members only content. Confirm that you have not removed this link by visiting the Memberships > Advanced Settings page in the WordPress admin.
Styling the Log In Page
TML is very lightly styled – the shortcode output on your generated Login and Password Reset pages will inherit your theme styling.
If you’re running Memberlite , here’s a little code to enhance the appearance of your Login/Lost Password/Reset Password pages. Set the “Page Template” to “Full Width” and replace the page content with the following:
[row] [col medium="4" medium_offset="4"] <div class="pmpro_message pmpro_default">[theme-my-login]</div> [/col] [/row] |
I also checked the boxes to “Hide Page Title” and “Hide Breadcrumbs” in the Memberlite Settings box, then set the “Banner Description” to the following:
<h1 class="text-center">Log In</h1> |
The Conditional “Log In” link
After activating TML, navigate to the Appearance > Menus area of your admin. Under the “Pages” section in the left column, you’ll see pages titled “Log In” and “Log Out”. Add these two pages to your menu. TML has background logic in place to only show the appropriate menu link based on the user.
Take this one step further and use the Nav Menus Add On for Paid Memberships Pro. This will allow you to use the same theme location to show a different menu of links based on the visitor/user/member status. We use TML in combination with the Nav Menus Add On on this site to link to our member support forums for PMPro Core or PMPro Plus members using the “Member Menu” theme location of Memberlite.
Do More with Theme My Login
Theme My Login also has advanced logic for blocking the WordPress backend by “role”, as well as redirection on login based on “role”. You can read more about all the features of TML on their WordPress.org plugin repository listing.
If you’re looking to redirect members on login based on membership level, see this blog post on membership level redirection.
↧
Restrict Membership Signup by Country
This code recipe allows you to restrict members in specific countries from signing up.
The restricted countries are defined in a $restricted_countries array of level IDs and country codes (see the $pmpro_currencies array in the plugin file /includes/countries.php for included country codes).
↧
Sister Plugin for Addon Packages: Apply Parent Page’s Protection to All Child Pages
If you’re using Addon Packages to sell “à la carte” access to a single page, this sister plugin will extend the page protection to all child pages. If the feature proves popular, it may become a default part of the add on with filter to disable.
If a page’s parent has a price (defined as an “Addon Package”), the page will inherit its parent’s settings and show a default message about the restriction, the price, and a link to checkout.
↧
↧
Award MyCRED Points for Membership Level Checkout
If you’re using MyCRED or considering a system to award users for interacting with your WordPress powered website, this code recipe will set up a custom MyCRED hook to award points when a member signs up for level ID 1.
You can customize the recipe for your specific point values and level IDs. This may eventually become a full MyCRED Add On for Paid Memberships Pro – so please share a comment if you are interested and some feedback on requested features.
↧
Membership Logic to Enable or Disable Popups for Popular WordPress Popup Plugins
Using popups to generate more membership signups or show exclusive offers to members only can be a great addition to your membership site. But, how do you filter popups to target the RIGHT audience?
Enter the filters…
The code recipes below demonstrate how to filter popups based on the user or site visitor’s membership level. We like using this method in combination with the new Signup Shortcode Add On for a streamlined “Unlock this post now” experience.
Popup Maker — WordPress Repo | Plugin Homepage
When I began this post, I was looking in the WordPress plugin repository for a basic, open source popup plugin with simple styling options: enter Popup Maker.
This code recipe will filter the display of a popup using Popup Maker’s pum_popup_is_loadable filter. The recipe hides the popup if there is a logged in user with membership level ID 1. You can modify the recipe for your level IDs, or change the conditional to require level ID 1 or an array of level IDs.
Popups – WordPress Popup — WordPress Repo | Plugin Homepage
This open source option is loaded with integrations for popular third-party form plugins and engagement tools. There are some built-in filters for the popup display cases, just not for membership level…
This code recipe will filter the display of a popup using the Popups plugin’s custom rules filter. The recipe enables the popup ONLY for a logged in user with membership level ID 1. You can modify the recipe for your level IDs, or change the conditional to hide for level ID 1 or an array of level IDs.
Popup Builder — WordPress Repo | Plugin Homepage
This is a more bare-bones popup option, but for my testing did just what I needed it to do without hassle.
This code recipe will insert the selected popup shortcode via wp_footer throughout your site to any non-member. You can modify the recipe for your level IDs, or change the conditional to hide for level ID 1 or an array of level IDs.
OptinMonster — Plugin Homepage
OptinMonster is more than just a popups plugin, with premium features for inserting optin forms in posts, in a floating bar, based on exit-intent and more. A paid account (starting at $49/yr) is required to use the plugin.
This code recipe will remove the optin using a script placed via the wp_footer action. The recipe hides to popup for all logged in users with any membership level. You can modify the recipe for your level IDs, or change the conditional to enable the popup for members only.
↧
Advanced Category Techniques for Filtering Searches and Archives to Members and Non-Members
If you’ve set the option “Filter Searches and Archives” to “Yes” under the Memberships > Advanced Settings page, all of the posts in your members-only categories will be hidden from the main page, archives, and search queries. This code gist allows you to add specified categories back into the query.
Why would I want to do this?
This is useful for sites that want to totally exclude posts from certain categories from being seen by a visitor or indexed by search engines, while keeping posts in other restricted categories discoverable.
Note that the posts in these categories will still be locked to members-only, they’ll just appear in the appropriate places as teaser content for your membership offering.
The Code Recipe
↧