Today’s web user has certain expectations about your site’s “Log In” links. This post covers a few methods to add these links to the expected location on your website. Use one of the options below to add a conditional “log in” link to a Menu in the WordPress Appearance > Menus admin page.
-
Use the plugin BAW Login/Logout Menu
![baw-login-logout]() This plugin (available in the WordPress plugins repo) is the most simple option. After activating, you will see a new section titled “Login/Logout links v1.3.2” in the Appearance > Menus area of your admin. Simply click to add the Log In|Log Out link to a menu, save the menu and you’re done.
This plugin (available in the WordPress plugins repo) is the most simple option. After activating, you will see a new section titled “Login/Logout links v1.3.2” in the Appearance > Menus area of your admin. Simply click to add the Log In|Log Out link to a menu, save the menu and you’re done. or search for “BAW Login/Logout” from your Plugins > Add New WordPress admin. (Note that the plugin hasn’t been updated in awhile but does work with the newest version of WordPress).
-
Use the plugin Theme My Login
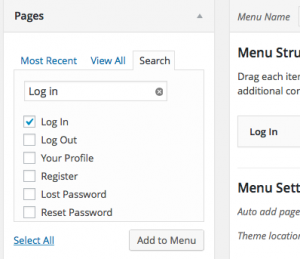
In addition to a conditional menu link, we recommend this plugin (also available in the WordPress plugin repo) for many other reasons, including a themed (frontend) login, password recovery, and user profile section.
After activating the plugin, navigate to the Appearance > Menus area of your admin. Under the “Pages” section in the left column, you’ll see a page titled “Log In”. Add this page to your menu. The link will automatically swap between “Log In” and “Log Out” based on the session.
![theme-my-login_conditional-menu]()
Theme My Login also has advanced logic for blocking the WordPress backend by “role”, as well as redirection on login based on “role”. If you need to redirect members on login based on membership level, see this blog post by Jason.
or search for “Theme My Login” from your Plugins > Add New WordPress admin.
-
Use the Memberlite Theme
The Memberlite Theme has a built in log in / log out menu area in the upper right area of your WordPress site. You can enable this feature on the Appearance > Customize > Memberlite Options screen in the WordPress admin. Check the option to “Show Login/Member Info in Header”.
If the user is logged in and Paid Memberships Pro is active, the member will see their display name linked to the ‘Membership Account’ page, alternately they will see their display name linked to the ‘Edit Profile’ page.
You can add a members menu to this area under ‘Appearance’ > ‘Menus’ screen in the WordPress Admin. Read more about Memberlite menu options here.
-
Custom Code the Menu In Your Theme or via a Custom Filter
If you’re comfortable with editing your theme, you can add the login/logout link anywhere you would like via this function:
<?php wp_loginout(); ?>
The function has two parameters:
<?php wp_loginout( $redirect, $echo ); ?>- $redirect:
- (optional) URL to redirect to on login/logout.
- $echo:
- (optional) If true, echos the link, if false, returns the link as a string. (default: true)
Read more about this function at the WordPress codex, including how to filter a wp_nav_menu to add the conditional link via a function in your theme’s functions.php file or a helper PMPro Customizations plugin.
 This plugin (available in the WordPress plugins repo) is the most simple option. After activating, you will see a new section titled “Login/Logout links v1.3.2” in the Appearance > Menus area of your admin. Simply click to add the Log In|Log Out link to a menu, save the menu and you’re done.
If you’re on a multisite network, note that these methods may not work 100% as intended. Using the WordPress function in a theme file is the best method for your network/multisite.